Streamlit is a startup that developed a popular open source project for building data-based apps. Snowflake had recently announced it was acquiring Streamlit for $800 million, quite a sum! In Frosty Friday challenge #8, We will surely get acquainted with it. Our task is to ingest the data with snowflake and create a Streamlit small dashboard to interact with it. Streamlit and Snowflake via python… Interesting? Let’s find out!
There are 2 parts to the task.
First part is to set snowflake to ingest the data and populate a table. The second part will be to use the Streamlit infrastructure and connect to the data via a python script to unleash Streamlit capabilities.
Configure Snowflake
I recently created a new snowflake trial account, so we’ll go very briefly through the setup, and you’ll find remarks through out the SQL code.
// Creating a Database
CREATE OR REPLACE DATABASE atzmon_db;

// Creating a Warehouse
CREATE WAREHOUSE snowflake_wh
WITH
  WAREHOUSE_SIZE = XSMALL
  AUTO_SUSPEND = 60
  AUTO_RESUME = TRUE
  INITIALLY_SUSPENDED = TRUE
  STATEMENT_QUEUED_TIMEOUT_IN_SECONDS = 300
  STATEMENT_TIMEOUT_IN_SECONDS = 600;

// Environment Configuration
USE WAREHOUSE snowflake_wh;
USE DATABASE atzmon_db;
USE SCHEMA public;

// Creating a CSV file format
CREATE OR REPLACE FILE FORMAT ch8_csv
  type = 'CSV'
  field_delimiter = ','
  skip_header = 1;

// Creating a Stage
CREATE OR REPLACE STAGE ch8_stg
  file_format = ch8_csv
  url = 's3://frostyfridaychallenges/challenge_8/payments.csv';

// List objects in stage
LIST @ch8_stg;

// Checking the CSV in stage
SELECT $1,$2, $3, $4
FROM @ch8_stg (file_format => ch8_csv);

// Creating a table and table schema
CREATE OR REPLACE TABLE ch8_tbl(
    id VARCHAR,
    payment_date VARCHAR,
    card VARCHAR,
    amount NUMBER
    );

// Copy data to newly created table
COPY INTO ch8_tbl
FROM @ch8_stg;

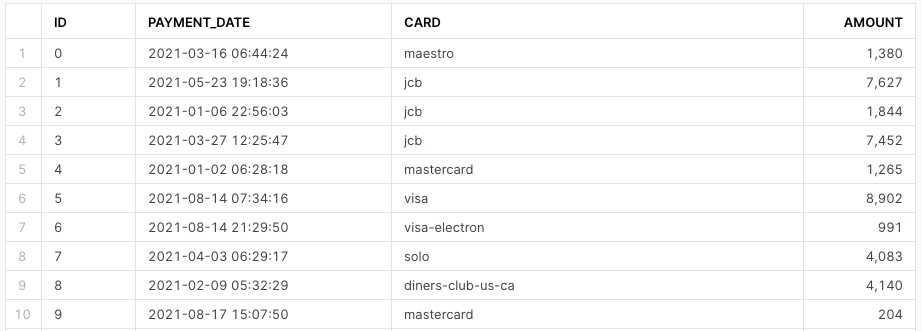
SELECT * FROM ch8_tbl;

Python, Streamlit and Snowflake
Now that we have all our data in place, we can scratch our heads around Python, Streamlit and Snowflake.
The challenge notes that we shouldn’t expose passwords, and indeed it is a common best practise to use a configuration file for password and other related configurations.
Enter ConfigParser
Although the challenge points out to use Streamlit secrets, I will be using ConfigParser, a great python package to handle configuration files.
As always, I will be using Pycharm for this.
I created a file within the working folder named config_sf.ini, where I will place all related information. The config file should resemble the one below, with your info filled in.
[Snowflake]
sfAccount = <snowflake account>
sfUser = <user name>
sfPassword = <password>
sfWarehouse = <warehouse>
sfDatabase = <database>
sfSchema = <schema>
We will use ConfigParser to read and assign the snowflake configuration.
# Importing needed packages
from configparser import ConfigParser
import streamlit as st
import pandas as pd
import snowflake.connector

# Reading the configuration file with 'configparser' package
config_sf = ConfigParser()
config_sf.sections()
config_sf.read('config_sf.ini')

# Assigning snowflake configuration (Environment)
sfAccount = config_sf['Snowflake']['sfAccount']
sfUser = config_sf['Snowflake']['sfUser']
sfPassword = config_sf['Snowflake']['sfPassword']
sfWarehouse = config_sf['Snowflake']['sfWarehouse']
sfDatabase = config_sf['Snowflake']['sfDatabase']
sfSchema = config_sf['Snowflake']['sfSchema']
Snowflake-Connector-Python
Using the snowflake-connector-python package, let’s establish our snowflake connection.
# Connect to Snowflake using the configurations above
conn = snowflake.connector.connect(
    user=sfUser,
    password=sfPassword,
    account=sfAccount,
    warehouse=sfWarehouse,
    database=sfDatabase,
    schema=sfSchema
    )
In order to fetch the data that we need, l will aggregate the data and construct an SQL query to run using the script.
# SQL query
query = """
    SELECT
        DATE_TRUNC('WEEK', TO_DATE(PAYMENT_DATE)) as payment_date,
        SUM(amount) as amount_per_week
    FROM CH8_TBL
    GROUP BY 1;
    """
We’ll define a function to load the data from snowflake to a pandas data frame. We’ll open a snowflake cursor, iterate and copy records while using a list comprehension to get the columns. Lastly, we’ll set payment_date as an index.
# This keeps a cache in place so the query isn't constantly re-run
@st.cache

# Creating a function to load the data into a pandas data frame
def load_data():
    cur = conn.cursor().execute(query)
    payments_df = pd.DataFrame.from_records(iter(cur),
                  columns=[x[0] for x in cur.description])
    payments_df['PAYMENT_DATE'] = pd.to_datetime(payments_df['PAYMENT_DATE'])
    payments_df = payments_df.set_index('PAYMENT_DATE')
    return payments_df
# Using the load_data() function to load the data
payments_df = load_data()
# This function returns the earliest date present in the dataset
def get_min_date():
return min(payments_df.index.to_list()).date()
# This function returns the latest date present in the dataset
def get_max_date():
return max(payments_df.index.to_list()).date()Streamlit
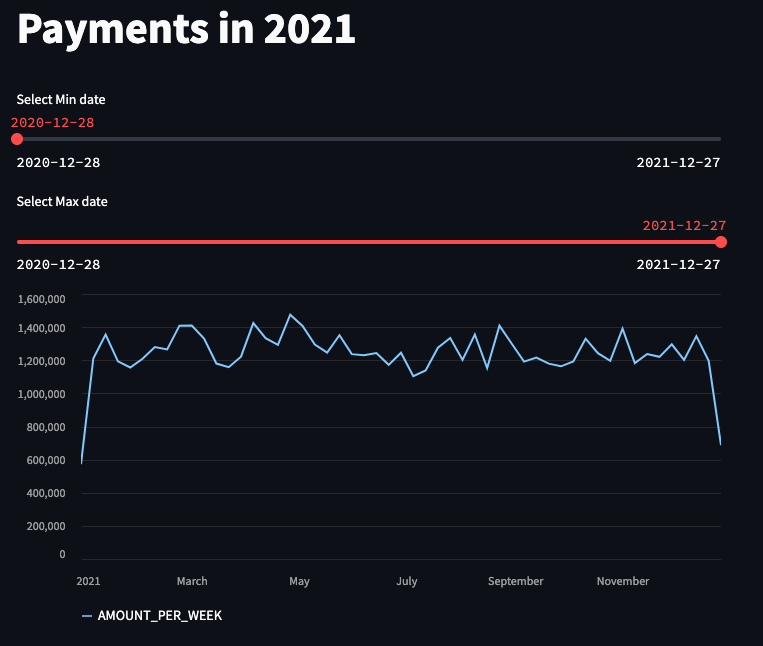
Using the Streamlit package we will start building our small dashboard. Here, we’ll make use of st.title and st.slider.
# This function creates the app with title, min and max slider
def app_creation():
    st.title('Payments in 2021')
    min_filter = st.slider('Select Min date',
                           min_value=get_min_date(),
                           max_value=get_max_date(),
                           value=get_min_date()
                           )
    max_filter = st.slider('Select Max date',
                           min_value=get_min_date(),
                           max_value=get_max_date(),
                           value=get_max_date()
                           )
We’ll create a mask to make sure that date records in data frame are: (1) same or greater than the minimum date filter and (2) same or smaller than the maximum date filter.
mask = (payments_df.index >= pd.to_datetime(min_filter)) \
             & (payments_df.index <= pd.to_datetime(max_filter))

# This line creates a new data frame that filters
# the results to between the range of the min
# slider, and the max slider
payments_df_filtered = payments_df.loc[mask]
# Create a line chart using the new payments_df_filtered dataframe.
st.line_chart(payments_df_filtered)
# Call the app_creation function
app_creation()To make full use of Streamlit, type streamlit run <path to python file>.py in your working folder’s Terminal (e.g. streamlit run /Users/atzmonky/PycharmProjects/Snowflake/ff_ch_8.py).
You can now view your Streamlit app in your browser. Happy Days!

In case you found this post interesting, please consider to:
Check out our blogs page to view more blogs on Tableau, Alteryx and Snowflake.
Work together with one of our consultants and maximise the effects of your data.
Contact us, and we’ll help you right away.


