How to pivot tables in Alteryx might have seemed a little unique or confusing for the some people who have recently begun their Alteryx journey – me included. In my previous experience, I used the Pandas module for Python for data prep and analysis. There, you would pass a command of pd.pivot(...). Even in Excel, pivoting is done through one tool. However in Alteryx, pivoting is split into two separate tools. One for horizontal to vertical layout, one for vertical to horizontal layout pivoting. Even-though it might seem odd in the beginning, when you get familiar with the tools and their unique functionalities, it will become very intuitive and easy to use.
In this blog, I will give a short introduction on what pivoting is and why it is useful. Then I will move onto going through the two separate tools for pivoting in Alteryx, how they work and show examples along the way.
What is Pivoting?
Pivoting tables is a powerful tool for data analytics and can help answer important questions about the data. Essentially, pivoting tables refers to changing the layout of your tables. Transforming columns to rows and rows to columns to be more exact. The pivoting technique allows us to summarise, group and do further calculations with data to help with our analysis. In Alteryx, pivoting can be necessary because some tools require the data structure to be in a specific way. For a more in-depth explanation of pivoting in general, check out this blog.
How to Pivot Tables in Alteryx
As mentioned before, there are two separate tools for pivoting in Alteryx. They are called the Transpose and the Cross Tab tool. As a general rule, you should have a clear idea on how your tables should look like before diving into the configurations of the tools. They might be challenging to understand if you do not.
The Transpose Tool
The Transpose Tool pivots the orientation of the data in a table by moving the horizontal data to a vertical axis.
The configuration window of this tool is comprised of 3 sections: Key Columns, Data Columns and Missing Columns:
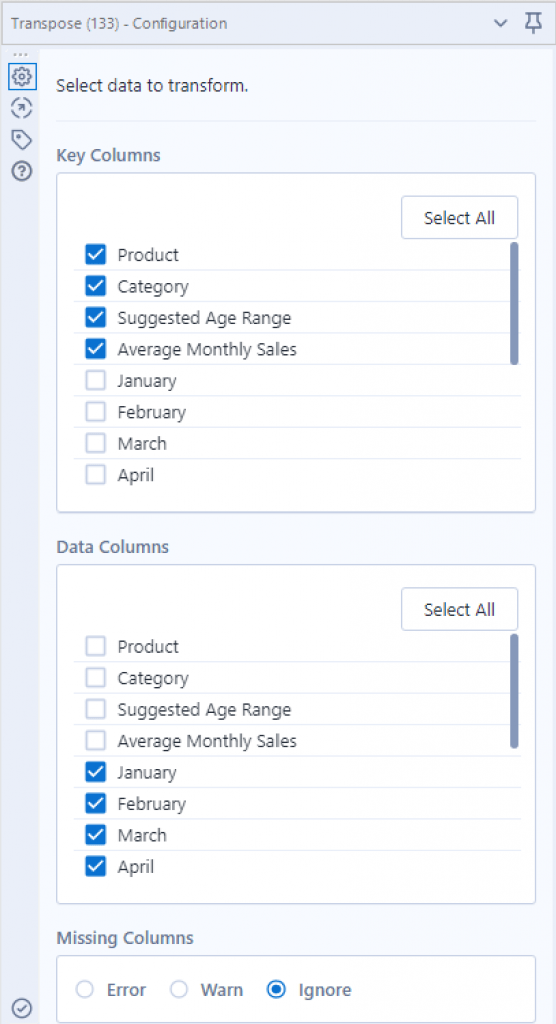
Key Columns: This section specifies the key columns of the dataset that will not be changed. But will be duplicated in the new rows that are created by the tool.
Data Columns: Columns that are selected in this section will have their names and values separated and stacked on two different columns named “Name” and “Value”.
NOTE: Columns that are not selected in Key or Data columns will be dropped.
Missing Columns: Refers to how the tool should react when any of the specified key and data columns are missing from the input.
This configuration will have the columns of “Product”, “Category”, “Suggested Age Range” and “Average Monthly Sales” unchanged but duplicated vertically for every repetition of the month columns. In which are transformed onto a vertical format along with their values.
Below is a sample of the first five rows before and after the transpose tool with the configuration above:


The Cross Tab Tool
The Cross Tab tool is effectively the inverse of the transpose tool. This tool pivots the data from a vertical layout to a horizontal one and performs summarisation.
The configuration window of this tool is a little more complex than the transpose tool. It has 6 sections: Group Data by these Values, Change Column Headers, Values for New Columns, Method for Aggregating Values, Separator and Field Size.
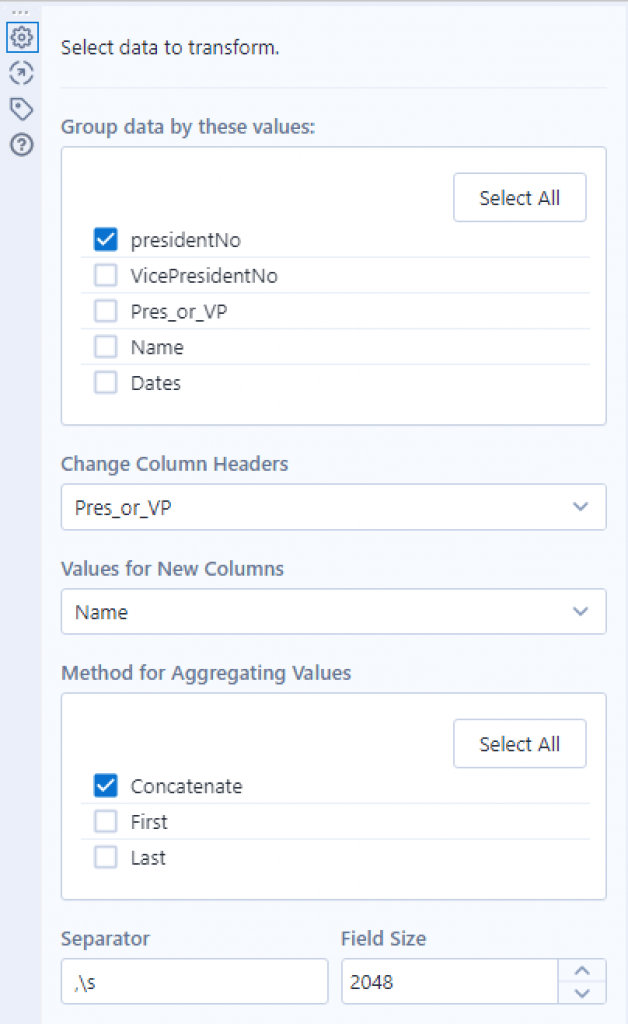
Group data by these values: Groups the selected columns that there is one unique value per row.
Change Column Headers: The new columns that are created will be populated with the unique values in the rows of the selected column.
Values for New Columns: The selected columns values will populate the column(s) created from the header column.
Method of Aggregating Values: At least one of three methods needs to be selected for the transformation to take place. The aggregation methods change depending on the data type of the incoming column.
Separator and Field Size: Characters entered in the separator section will be added between the concatenated strings. The field size refers to the maximum field length.
Below is another sample of a table before and after its passed through the cross tab tool with the configuration shown above. A sample of five rows are taken:


For more specific descriptions of the two tools, check out the Alteryx documentation on the Transpose tool and the Cross Tab tool. To read more blogs about Tableau and Alteryx, our training offerings and consultancy details, visit our page The Information Lab NL for more.

