The tree tool can be used when you have a set of selections that you need to execute before interacting with your app. They are a good alternative when there is a hierarchical order to those options.
Let’s say you’re building an app to be used by the country managers of your company. The users will input their data by state / region and month. So, before actually inputting the data, they need to select multiple values: a country, a state, a year and a month.
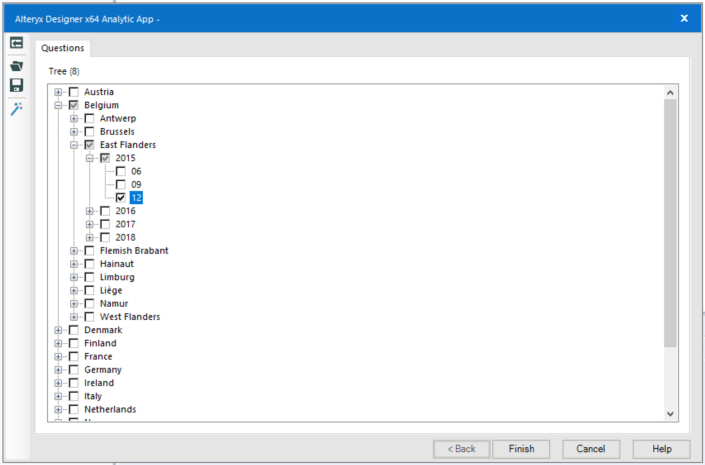
If you are using the tree tool, you can do all those actions in the same screen.
Below you can see how the tree interface looks like, but how do you build it and which are its limitations?

First, the logic behind it
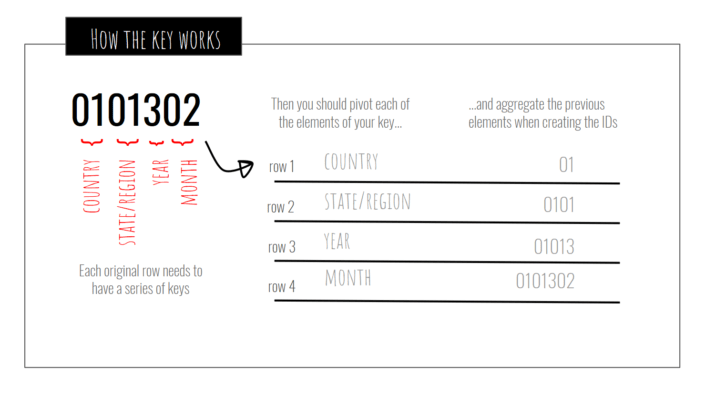
The tree tool requires some preparation to be used. First, you need to create a hierarchy in your data, like the logic behind a catalog index – an unique ID that tells you about the groups the asset is part of.
For instance, in my workflow using data from Superstore, my first row has the ID 0101302. Each part of this ID gives me a detail about this order: the first double digits show the country it comes from (Austria), the second two digits indicate the region (Carinthia), the following digit indicates the year (2017) and the final two numbers are related to the month of the year (September).

To make the tree works you will need to turn all those numbers into an unique indicator (0101302) and, at the same time, pivot your data to create one line for each one of the previous mentioned variables.
On my example, for each original row, I ended up with four new rows (one per each element I’d like to have on my tree), which means that if you are working with a very big data set with millions of entries, it can become a limitation since you will multiply the number of rows by the number of elements of your tree.
How to build it
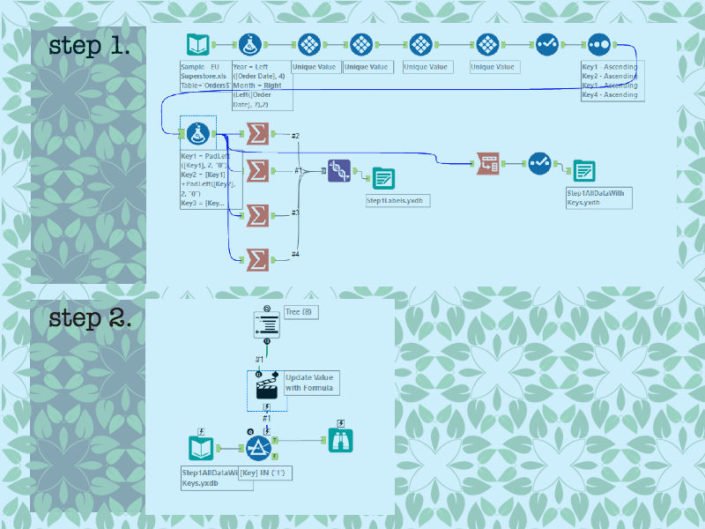
Building a tree implies having two different files: one to be used to generate the labels – containing the values that will appear and its respective IDs – and a second file with the pivoted data.
It also means to have two different workflows: one to prepare the data and create the above files and a second workflow where the tree tool goes on.

The labels file should be connected through the tree tool meanwhile the pivoted file goes into a normal input tool. All you need to do then is to add a filter and an action tool to make the value selected in the tree be applied to the dataset.
To test if it’s working, press the “run as analytic app” button and check if your tree is well structured and if the filter is applying to the main datasource. If it’s all fine, you can chain your two workflows assuring that the tree will be updated when there are changes in the data (more about chained apps here ).
Avoiding potential pitfalls
Your tree is horrible, with lots of things out of order? Is your filter crazy? There are two things that deserve some special attention when using the tree tool.
First of all, pay attention to the length of the IDs in the hierarchy. Let’s say you have 120 cities in one country. It will require IDs with three digits for all the cities in your dataset.
So, if you have a city showing ID 1, make sure it appears as 001 (the PADLEFT function will be your best friend), otherwise Alteryx would not be able to identify that all cities are cities – remember, it will be reading a big string where each part indicates one element of your hierarchy, so that one of elements has the same number of digits.
Another thing to be aware of is the configuration of your filter and action tool. To make it work you should use IN instead of the filter (for example, “[Key] in [# 1]” instead of “[Key] = [# 1]”), since the selection process using the tree tool is based in multiple values (the ID for the country + the ID for the city).
For the same reason the action tool should also be configured using regex. The original formula in the filter tool should be replaced by ‘[Key] in (“‘ + REGEX_Replace ([# 1], ‘\ n’, ‘”, “‘) +” “) ‘.
A final advice is regarding the use of trees in the Gallery. Unfortunately, if your main idea is to save your desktop, you can not use it. html, if this is the case, share with us your experience in the comments!


