In this blog we will describe how you can add custom geocoding in Tableau Desktop. Custom geocoding can be very useful. Especially when your organisation is working with files containing location names. Often, the link to the actual location on the map is missing in Tableau. This is where custom geocoding comes in. Custom geocoding allows you to link location names to actual locations on the map. All of this can be done without any GIS or spatial knowledge. Besides, I will also describe some common errors and mistakes. Use these to get custom geocoding working.
First, let’s take a small step back. What would be a good use case for custom geocoding? Imagine you have an Excel file. This file contains store locations. The Excel file contains a column for the country, city and street name of each store. As you can see below, we do not have any latitude or longitude to create a map containing store locations. Let’s load this file in Tableau Desktop.

As we can see in Tableau, the columns City, Province and Country are marked as spatial columns. This is indicated by the globe symbol. In Tableau, we can create maps using these spatial columns. Tableau automatically recognises cities, province, countries and even postal code areas. But what about our store locations? This is where custom geocoding comes in. We can add spatial locations to Tableau, like our store locations. That way, anytime we connect to our store data, Tableau knows this is a spatial column as well. This allows us to also create maps using the store locations.

Custom geocoding works in three steps:
- Create a CSV file with your location data.
- Import Custom Geocoding files in Tableau Desktop.
- Assign geographic roles to your fields.
Step 1: Create CSV
First, we are creating a CSV (Comma Separated Value) file. This file will link our store locations with a latitude and longitude. This allows Tableau to know where on the map the store is located. Note that the CSV requires a specific format. This format can be found here. The column names must match the descriptions exactly. Otherwise this method won’t work. I use Google Maps to find the coordinates. Simply type in the adres. Once you have found the location, right click. The coordinates will pop up. Click these coordinates again to cop y them to your clipboard. You can then paste this information in your CSV. In the screenshot below, you can see the resulting CSV file.


Step 2: Import CSV in Tableau
Now the CSV file is finished, we can import it in Tableau. You would say this is the easiest step. Unfortunately, looks are deceiving. This step is where most people run into an error. I will describe how the process should work. The most common errors and their solutions are listed under troubleshooting. If you are interested in those, scroll down a bit.
Let’s import the CSV file into Tableau Desktop. In the top menu, navigate to Map > Geocoding > Import Custom Geocoding…

A new screen will open. This screen will prompt for a file path. Select the folder containing the CSV file (so not the actual file itself).

Tableau will then import the new Geocoding file. The information in this file will be added to the Geocoding Database that is stored in Tableau. You are now ready for the final step.
Step 3: Assign geographic roles to your fields
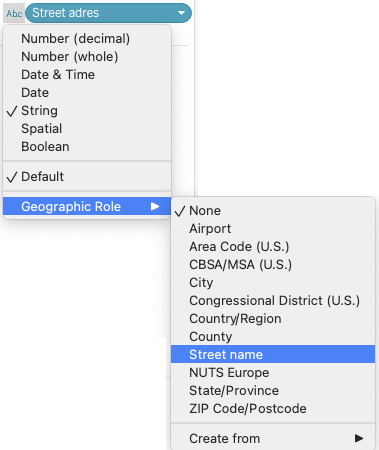
Now that we have imported the new Geocoding information, it is time to put it to work. Remember the Excel file we started with? We can now use the street adres column as a spatial column. We have to assign it with our new geographic role. First, select the column you want to assign a geographic role. Then, click the ‘abc’ icon, move down to Geographic Role and select your newly created role: Street name. Tableau will now try to match the text in the street adres column with its updated Geocoding Database. Now you can create maps with your stores!

Troubleshooting
Here are some of the most common errors when working with Custom Geocoding:
- Warning: columns are missing. Tableau requires certain columns for custom geocoding. These must match the description exactly. The columns are also case sensitive. Check the column names here.
- I have all columns but still a warning appears. Make sure that the column headers do not contain any whitespace. Sometimes you accidentally put a space before or after the column name.
- Map does not show locations. Have you tried to drag in the country and province field to detail? Tableau uses a spatial hierarchy and needs to know in which country/province/city your custom location is.
- Error when creating map. Check the delimiter in your coordinates. Is it a point or a comma? Try switching it to either a point or a comma. Save the CSV and import it again into Tableau.
- Changes I made in the CSV won’t show. Try to remove the custom geocoding, and then importing it again.
Want to know more about maps and spatial in Tableau? Let’s connect on LinkedIn. Also, I will post dashboards using maps on Tableau Public. Want to improve your Tableau skills? Have a look at our training sessions. We now also offer a full day Tableau GIS training! Lastly, my colleagues and I are glad to help with any of your (spatial) data questions!


