We’ve all been driven by our curiosity and wanted to build a specific type of dashboard that has a feature that we haven’t used before (a feature that you don’t know actually exist but by god, if it exists you’re going to make that dashboard use it) For me it was the use of animated GIFs that would change on selection of a table row. The idea itself wasn’t that complex but the implementation went a bit deeper than I would’ve expected.
Our ingredients:
Multiple animated GIFs
A Dashboard
A table, in my case a bar graph
Adding the GIF to the Dashboard
The first step that we have to take is to add the gif to the dashboard. That shouldn’t be too difficult but as some might already know, if you add it as an image, the gif doesn’t actually move.
What we have to do is add the gif as a web page and direct the web page to the gif. This also means that if you’ve got a locally stored gif, you’ll have to host it somewhere to make it accessible.
This is where we encounter our second step: the webpage is only able to accept 1 URL but we’d like it to show multiple pages (GIFs).
Using a single web page object for multiple GIFs
The way to do this is by using a parameter in the actual URL. Instead of “website.com/reallycoolgif.gif” we’ll use “website.com/<gif parameter>.gif”.
Creating the parameter
We want to create a logically named parameter that has all of the names of the gifs in question. The creation of a parameter isn’t very difficult but did spring up a question: which value is being used in the URL, value or display as? Luckily for you, there is an happy ending to this blog, I figured out the answer, so I’ll save you some time: value is the actual value that’s being used in <gif parameter>.
Using the parameter
Now that we’ve got the parameter, let’s incorporate it in our dashboard. To do this we’ll create a new URL action: open the “actions” window -> add action -> go to URL.
Again:
- Use a name that makes sense
- Use the dashboard as a source
- Use our newly created parameter in the URL: website.com/<gif parameter>.gif (don’t forget the .gif at the end)
- The URL target should be pointing at the Web Page object that’s currently on the page – if not, add one and point this option at it.
The end… right?
Everything should work but if you stop here , you’ll notice that the gif isn’t actually changing on your selections. This is where our last step comes into play.
Linking it all together
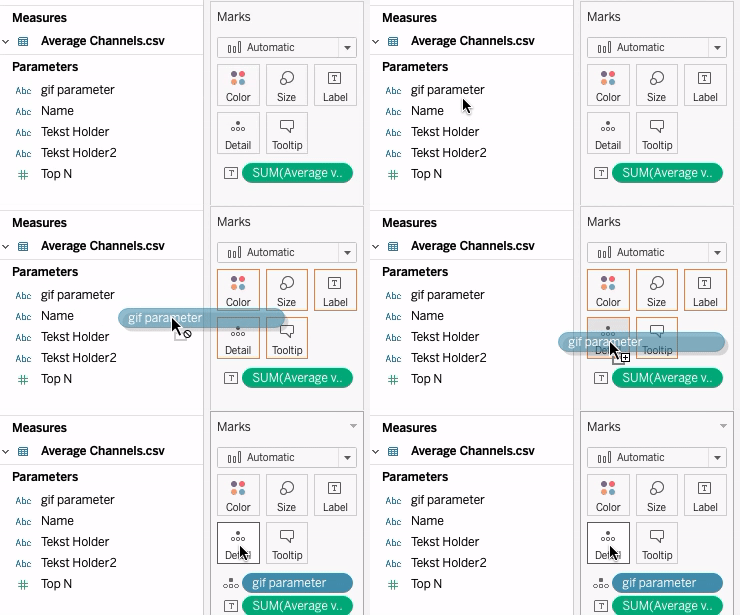
The last step that we have to take might seem a bit odd but it’s what’s needed to link everything together. Go to your worksheets that you want to use to gifs with and add the <gif parameter> to your Detail on the Marks card. This will update the value of the parameter every time you click on a new table row.

Would you like to see the dashboard that inspired this blog? You can check it out on my Tableau Public. You can also follow me on LinkedIn and Twitter.
In need of further explanations or help? Check out our trainings page and find the one that suits your needs best. You can also hire me as a consultant!

